
前言#
这回的bug有点幼稚,但是算是一个常见的。
bug算是引子,我们主要是学习v-model的源码
突然发现知乎支持了markdown实时转换了?!
bug#
环境#
- bug环境vue2.6.14
- 源码探讨环境vue3.2.41(因为要用到之前的配置,就不根据最新的代码了)
代码#
<Tab v-model="selectedTabId" @click="handleClick"></Tab>
...
handleClick (val) {
  if (!window.confirm("当前数据未保存,是否离开")) {
     return
  } else {
     ...
  }
}原因#
这个bug有点幼稚,不过归根到底其实是一种误区 :如果这里return了,那么selectedTabId就不会变。
这里的handleClick是回调!回调的意思是 完成之后才触发!
就这么简单。
处理方案#
这个难度看具体业务,简单的就是调整下,不通过v-model的方式去处理,但如果业务错综复杂,selectedTabId不能轻易改动,那么这个时候可以考虑使用computed代理:
computed: {
  selectedTabIdModel: {
    get () {
       return this.selectedTabId;
    },
    set (val) {
      this.handleClick(val);
    }
 }
}
...
handleClick (val) {
  if (!window.confirm("当前数据未保存,是否离开")) {
     return
  } else {
     ...
+     this.selectedTabId = val;
  }
}
那么这个bug到此为止,我们进入主题,来学习下v-model的源码
v-model用法#
Component v-model | Vue.js (vuejs.org)
突然发现vue3.4之后支持宏(macro)的方式了,来学习下
<!-- Child.vue -->
<script setup>
const model = defineModel()

function update() {
  model.value++
}
</script>

<template>
  <div>parent bound v-model is: {{ model }}</div>
</template>


<!-- Parent.vue -->
<Child v-model="count" />
嘿,方便了很多。
来看下相关的描述:通过defineModel()返回的是一个ref对象。既然是ref,那么它自然可以被访问(accessed)和修改(mutated),唯一不同的是,它是在父组件的值和子组件的值之间双向绑定(two-way binding)的:
- 它的
.value是和父组件v-model绑定的值同步的(synced) - 当子组件中修改了,那么父组件中对应的那个数据的值也会同步更新。
这意味着我们可以顺便把它绑定到一个input上,这样就不需要额外的代码,很是舒服
<script setup>
const model = defineModel()
</script>

<template>
  <input v-model="model" />
</template>
既然它是作为一个宏存在的,那么它在编译阶段就应该展开。
展开的自然就是我们熟悉的写法:
<script setup>
const props = defineProps(['modelValue'])
const emit = defineEmits(['update:modelValue'])
</script>

<template>
  <input
    :value="props.modelValue"
    @input="emit('update:modelValue', $event.target.value)"
  />
</template>- 一个名为:
modelValue的prop,接收父组件的值,是同步的 - 一个
emit事件update:modelValue,抛出新的值给父组件
另外既然是prop,那它自然可以设置默认值和是否必要:
// making the v-model required
const model = defineModel({ required: true })

// providing a default value
const model = defineModel({ default: 0 })
不过默认值这个我们需要特别注意,来看个例子:
// child component:
const model = defineModel({ default: 1 })

// parent component:
const myRef = ref()

<Child v-model="myRef"></Child>父组件没有提供任何的值,子组件设置了默认值1。这种情况下父组件和子组件就去同步了(de-synchronization)
当然,如果我们存在多个v-model呢?这种时候自然需要区分才行:
<!-- parent components -->
<UserName
  v-model:first-name="first"
  v-model:last-name="last"
/>

<!-- MyComponent.vue -->
<script setup>
const firstName = defineModel('firstName')
const lastName = defineModel('lastName')
</script>

<template>
  <input type="text" v-model="firstName" />
  <input type="text" v-model="lastName" />
</template>
相当于:
<script setup>
defineProps({
  firstName: String,
  lastName: String
})

defineEmits(['update:firstName', 'update:lastName'])
</script>

<template>
  <input
    type="text"
    :value="firstName"
    @input="$emit('update:firstName', $event.target.value)"
  />
  <input
    type="text"
    :value="lastName"
    @input="$emit('update:lastName', $event.target.value)"
  />
</template>
整体简洁了很多。
**注意:**如果没有指定参数即v-model:args的args,那就是使用默认的,需要在defineProps里声明modelValue,因为没命名。
然后我们还可以设置修饰符(modifier),比如.trim、.number、.lazy等,然后我们甚至可以自定义修饰符!
比如:
<MyComponent v-model.capitalize="myText" />capitalize是我们自定义的修饰符,在子组件中我们可以获取到:
<script setup>
const [model, modifiers] = defineModel()

console.log(modifiers) // { capitalize: true }
</script>

<template>
  <input type="text" v-model="model" />
</template>
有了这修饰符信息,我们可以做一些自定义的行为:
<script setup>
const [model, modifiers] = defineModel({
  set(value) {
    if (modifiers.capitalize) {
      return value.charAt(0).toUpperCase() + value.slice(1)
    }
    return value
  }
})
</script>

<template>
  <input type="text" v-model="model" />
</template>
另外这是原来的写法:
<script setup>
const props = defineProps({
  modelValue: String,
  modelModifiers: { default: () => ({}) }
})

const emit = defineEmits(['update:modelValue'])

function emitValue(e) {
  let value = e.target.value
  if (props.modelModifiers.capitalize) {
    value = value.charAt(0).toUpperCase() + value.slice(1)
  }
  emit('update:modelValue', value)
}
</script>

<template>
  <input type="text" :value="modelValue" @input="emitValue" />
</template>
方便了不是一点,当然,代价就是编译那边要塞一堆代码来处理这种场景。
ok,用法就了解到这里。接下来我们来探讨下源码。
简单的回顾下编译阶段源码#
宏的展开我们就不看了,我们还是聚焦于v-model自身。
如果看过往期代码分析的vue3源码学习--编译阶段汇总 - 知乎 (zhihu.com),那你应该知道这块编译阶段是在哪里处理以及如何处理的。
实际上分成两部分,核心部分是在compiler-core处理的,然后compiler-dom做一些额外处理。
**补充一下compiler-dom和compiler-core的关系:**实际上compiler-sfc调用的是compiler-dom,而compiler-dom是封装的compiler-core(调用compiler-core之前封装数据,补充一些方法再传给compiler-core),执行顺序不是compiler-dom先于compiler-core,而是compiler-core在parse之后transform的过程中调用compiler-dom封装的一些方法做额外处理比如处理v-model使用在input的场景等。
貌似有点乱,不过看一下compiler-dom的入口就知道了,篇幅问题,就不贴代码了,位置:packages\compiler-dom\src\index.ts
回到我们的分析中:
compiler-core-vModel.ts#
第一部分位置:packages\compiler-core\src\transforms\vModel.ts
代码就不贴了,简单地说。。算了,复习一下:
export const transformModel: DirectiveTransform = (dir, node, context) => {
  const { exp, arg } = dir

  // ... 省略处理错误场景代码

  const rawExp = exp.loc.source
  const expString =
    exp.type === NodeTypes.SIMPLE_EXPRESSION ? exp.content : rawExp

  // im SFC <script setup> inline mode, the exp may have been transformed into
  // _unref(exp)
  const bindingType = context.bindingMetadata[rawExp]
  const maybeRef =
    !__BROWSER__ &&
    context.inline &&
    bindingType &&
    bindingType !== BindingTypes.SETUP_CONST

	// ... 省略处理错误场景


  const propName = arg ? arg : createSimpleExpression('modelValue', true)
  const eventName = arg
    ? isStaticExp(arg)
      ? `onUpdate:${arg.content}`
      : createCompoundExpression(['"onUpdate:" + ', arg])
    : `onUpdate:modelValue`

  let assignmentExp: ExpressionNode
  const eventArg = context.isTS ? `($event: any)` : `$event`
  if (maybeRef) {
    if (bindingType === BindingTypes.SETUP_REF) {
      // v-model used on known ref.
      assignmentExp = createCompoundExpression([
        `${eventArg} => ((`,
        createSimpleExpression(rawExp, false, exp.loc),
        `).value = $event)`
      ])
    } else {
      // v-model used on a potentially ref binding in <script setup> inline mode.
      // the assignment needs to check whether the binding is actually a ref.
      const altAssignment =
        bindingType === BindingTypes.SETUP_LET ? `${rawExp} = $event` : `null`
      assignmentExp = createCompoundExpression([
        `${eventArg} => (${context.helperString(IS_REF)}(${rawExp}) ? (`,
        createSimpleExpression(rawExp, false, exp.loc),
        `).value = $event : ${altAssignment})`
      ])
    }
  } else {
    assignmentExp = createCompoundExpression([
      `${eventArg} => ((`,
      exp,
      `) = $event)`
    ])
  }

  const props = [
    // modelValue: foo
    createObjectProperty(propName, dir.exp!),
    // "onUpdate:modelValue": $event => (foo = $event)
    createObjectProperty(eventName, assignmentExp)
  ]

  // cache v-model handler if applicable (when it doesn't refer any scope vars)
  if (
    !__BROWSER__ &&
    context.prefixIdentifiers &&
    !context.inVOnce &&
    context.cacheHandlers &&
    !hasScopeRef(exp, context.identifiers)
  ) {
    props[1].value = context.cache(props[1].value)
  }

  // modelModifiers: { foo: true, "bar-baz": true }
  if (dir.modifiers.length && node.tagType === ElementTypes.COMPONENT) {
    const modifiers = dir.modifiers
      .map(m => (isSimpleIdentifier(m) ? m : JSON.stringify(m)) + `: true`)
      .join(`, `)
    const modifiersKey = arg
      ? isStaticExp(arg)
        ? `${arg.content}Modifiers`
        : createCompoundExpression([arg, ' + "Modifiers"'])
      : `modelModifiers`
    props.push(
      createObjectProperty(
        modifiersKey,
        createSimpleExpression(
          `{ ${modifiers} }`,
          false,
          dir.loc,
          ConstantTypes.CAN_HOIST
        )
      )
    )
  }

  return createTransformProps(props)
}

function createTransformProps(props: Property[] = []) {
  return { props }
}
代码100来行,也挺好理解。
不过还是结合测试用例会舒服很多。
我们的测试用例:
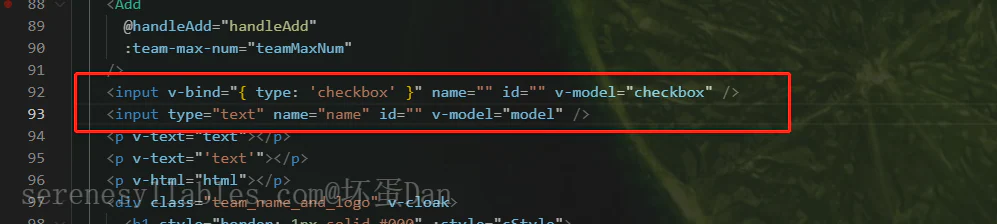
然后我们跑一下测试用例,不知道咋整的可以去看往期文章,这里就不多说了(至于为什么不直接使用自带的v-model测试用例,因为太麻烦。。要模拟那个场景需要写一堆代码,所以稍微改动了源码的部分import使得可以直接通过compiler-dom得到预期场景)。
-
dir:这个就是v-model:xxx="xxx",但是这时已经是parse之后的了,处于transform阶段,所以它是一个对象exp.loc.source是原始的代码,就是我们写的v-model="checkbox"的checkbox。 -
bindingMetadata是来自compiler-sfc处理完毕的script里的数据,是的,编译阶段template的处理需要script里的数据配合处理。(因为我们这里是直接从compiler-dom进入的,所以并没有script相关的内容,这部分在compiler-sfc里处理完毕) -
arg就是v-model:xx="xxx"里的xx,作为子组件需要的字段名,比如:<Add v-model:xx="xxx">里的xx,需要注意的是只能在组件中使用。 -
createSimpleExpression('modelValue', true)里的modelValue自然就是默认给子组件要用的字段名。另外这货也是可以动态设置的,比如v-model:[xx]="xxx"里的[xx]就是一个动态的。 -
eventName:自然就是emit的事件名。如果arg是动态的,那么就不能编译阶段生成了,得到runtime去创建组件的时候生成。注意这里的createCompoundExpression是标记这个arg是动态的,到了在generate阶段包裹一层,注入上下文用来在创建组件实例的时候生成对应字段。 -
const eventArg = context.isTS ? '($event: any)' : '$event':这段代码单独拉出来说一下,为什么转换成runtime的代码还得带有类型?这样不会报错么?因为vue-loader以及一系列vue的编译只是webpack(这里以webpack为基础)编译阶段的一部分,vue相关的编译结束后还会走babel-loader之类的,所以保持类型检查是可以的。 -
IS_REF:这个也简单说一下,我们平时在template中使用ref方法创建的数据是不需要加上.value的(部分情况),那是因为编译阶段会帮忙补充,这也算是一个语法糖吧。 -
modifiers:修饰符,仅作用于组件使用v-model的情况下。 -
ConstantTypes.CAN_HOIST:这个也单独拉出来说一下,这是vue的一种优化,将节点、属性等mark上NOT_CONSTANT、CAN_SKIP_PATCH、CAN_HOIST、CAN_STRINGIFY这四种标记,在patch(指的是更新而非创建)判断是否需要更新。
其它没什么好说的了,compiler-core部分结束。
在开始compiler-core之前,我们看下几种写法对应的编译产物(中间阶段,仅指vue编译阶段)。
组件中使用(动态propsName + 带有修饰符):
<Add v-model:[xx].hi="xxx"/>[
{
type: 16,
loc: {
source: "",
// ...省略源代码定位相关字段
},
key: {
type: 4,
content: "xx",
isStatic: false,
constType: 0,
loc: {
// ...省略源代码定位相关字段
source: "[xx]",
},
},
value: {
type: 4,
content: "xxx",
isStatic: false,
constType: 0,
loc: {
// ...省略源代码定位相关字段
source: "xxx",
},
},
},
{
type: 16,
loc: {
source: "",
// ...省略源代码定位相关字段
},
key: {
type: 8,
loc: {
source: "",
// ...省略源代码定位相关字段
},
children: [
"\"onUpdate:\" + ",
{
type: 4,
content: "xx",
isStatic: false,
constType: 0,
loc: {
// ...省略源代码定位相关字段
source: "[xx]",
},
},
],
},
value: {
type: 8,
loc: {
source: "",
// ...省略源代码定位相关字段
},
children: [
"$event => ((",
{
type: 4,
content: "xxx",
isStatic: false,
constType: 0,
loc: {
// ...省略源代码定位相关字段
source: "xxx",
},
},
") = $event)",
],
},
},
{
type: 16,
loc: {
source: "",
// ...省略源代码定位相关字段
},
key: {
type: 8,
loc: {
source: "",
// ...省略源代码定位相关字段
},
children: [
{
type: 4,
content: "xx",
isStatic: false,
constType: 0,
loc: {
// ...省略源代码定位相关字段
source: "[xx]",
},
},
" + \"Modifiers\"",
],
},
value: {
type: 4,
loc: {
// ...省略源代码定位相关字段
source: "v-model:[xx].hi=\"xxx\"",
},
content: "{ hi: true }",
isStatic: false,
constType: 2,
},
},
]忘了说了,这里type: 16是NodeTypes.JS_PROPERTY,注意这里的Node不是我们传统的dom的Node,而是vue自己的定义的,一个指令也可以是一个Node。
然后是原生的input绑定v-model(静态):
<input v-bind="{ type: 'checkbox' }" v-model="checkbox" />[
{
type: 16,
loc: {
source: "",
// ...
},
key: {
type: 4,
loc: {
source: "",
// ...
},
content: "modelValue",
isStatic: true,
constType: 3,
},
value: {
type: 4,
content: "checkbox",
isStatic: false,
constType: 0,
loc: {
// ...
source: "checkbox",
},
},
},
{
type: 16,
loc: {
source: "",
// ...
},
key: {
type: 4,
loc: {
source: "",
// ...
},
content: "onUpdate:modelValue",
isStatic: true,
constType: 3,
},
value: {
type: 8,
loc: {
source: "",
// ...
},
children: [
"$event => ((",
{
type: 4,
content: "checkbox",
isStatic: false,
constType: 0,
loc: {
// ...
source: "checkbox",
},
},
") = $event)",
],
},
},
]没啥好说的
compiler-dom-vmodel.ts#
然后回到compiler-dom,同样是省略掉处理错误的代码:
export const transformModel: DirectiveTransform = (dir, node, context) => {
  const baseResult = baseTransform(dir, node, context)
  // base transform has errors OR component v-model (only need props)
  if (!baseResult.props.length || node.tagType === ElementTypes.COMPONENT) {
    return baseResult
  }
   // ... 省略处理错误的场景

  const { tag } = node
  const isCustomElement = context.isCustomElement(tag)
  if (
    tag === 'input' ||
    tag === 'textarea' ||
    tag === 'select' ||
    isCustomElement
  ) {
    let directiveToUse = V_MODEL_TEXT
    let isInvalidType = false
    if (tag === 'input' || isCustomElement) {
      const type = findProp(node, `type`)
      if (type) {
        if (type.type === NodeTypes.DIRECTIVE) {
          // :type="foo"
          directiveToUse = V_MODEL_DYNAMIC
        } else if (type.value) {
          switch (type.value.content) {
            case 'radio':
              directiveToUse = V_MODEL_RADIO
              break
            case 'checkbox':
              directiveToUse = V_MODEL_CHECKBOX
              break
            case 'file':
              isInvalidType = true
              context.onError(
                createDOMCompilerError(
                  DOMErrorCodes.X_V_MODEL_ON_FILE_INPUT_ELEMENT,
                  dir.loc
                )
              )
              break
            default:
              // text type
              __DEV__ && checkDuplicatedValue()
              break
          }
        }
      } else if (hasDynamicKeyVBind(node)) {
        // element has bindings with dynamic keys, which can possibly contain
        // "type".
        directiveToUse = V_MODEL_DYNAMIC
      } else {
        // text type
        __DEV__ && checkDuplicatedValue()
      }
    } else if (tag === 'select') {
      directiveToUse = V_MODEL_SELECT
    } else {
      // textarea
      __DEV__ && checkDuplicatedValue()
    }
    // inject runtime directive
    // by returning the helper symbol via needRuntime
    // the import will replaced a resolveDirective call.
    if (!isInvalidType) {
      baseResult.needRuntime = context.helper(directiveToUse)
    }
  }

  // native vmodel doesn't need the `modelValue` props since they are also
  // passed to the runtime as `binding.value`. removing it reduces code size.
  baseResult.props = baseResult.props.filter(
    p =>
      !(
        p.key.type === NodeTypes.SIMPLE_EXPRESSION &&
        p.key.content === 'modelValue'
      )
  )

  return baseResult
}

export const V_MODEL_RADIO = Symbol(__DEV__ ? `vModelRadio` : ``)
export const V_MODEL_CHECKBOX = Symbol(__DEV__ ? `vModelCheckbox` : ``)
export const V_MODEL_TEXT = Symbol(__DEV__ ? `vModelText` : ``)
export const V_MODEL_SELECT = Symbol(__DEV__ ? `vModelSelect` : ``)
export const V_MODEL_DYNAMIC = Symbol(__DEV__ ? `vModelDynamic` : ``)
const baseResult = baseTransform(dir, node, context):第一行便是调用compiler-core的baseTransform也就是上面说的那个方法。这里拿的是没有处理修饰符的。tag:额,这个本来不应该多说,但是因为编译阶段涉及到很多的type,很容易搞混,所以这里强调一下,type有的时候和标签tag有关,但不是所有时候。tag指的是元素的标签。isCustomElement:是否是自定义元素,vue是支持自定义元素的:Global API: General | Vue.js (vuejs.org),注意是自定义元素而不是组件,这两者是有区别的,它和组件类似,但是返回的是原生的元素Using custom elements - Web APIs | MDN (mozilla.org)。(比如webComponent)checkDuplicatedValue:这个我把代码去掉了,逻辑就是判断这个input是否在用了v-model的情况下还绑定了value属性,这就是多余的行为了,因为v-model针对input会自动绑定上value属性。V_MODEL_RADIO:这些是runtime helper,也就是runtime执行时的辅助函数,用来确定如何渲染。__DEV__:你应该注意到了后面几个用来确定runtime要怎么处理input + v-model的定义,但是它们前面还加上了__DEV__,如果是生产环境就不需要定义,这是为什么呢?这个问题我们先记下,等会看编译产物会说原因。
所以简单的说 compiler-dom里关于v-model相关的逻辑 是对原生元素以及自定义元素做的额外处理。
ok,那么编译阶段就结束了,接下来我们来看下编译阶段的产物(包含webpack整个流程最终输出产物)。
编译阶段输出产物#
因为涉及webpack,所以我们需要搞一个项目,这里简单的贴一下配置:
{
  "name": "webpack-vue",
  "version": "1.0.0",
  "main": "index.js",
  "license": "MIT",
  "scripts": {
    "serve": "webpack-dev-server",
    "help": "webpack --help",
    "build": "webpack",
    "debug-1": "node --inspect-brk=3100 ./node_modules/webpack/bin/webpack.js",
    "debug": "node --inspect-brk=3100 ./node_modules/webpack-dev-server/bin/webpack-dev-server.js"
  },
  "dependencies": {
    "@babel/core": "^7.18.10",
    "@babel/preset-env": "^7.18.10",
    "babel": "^6.23.0",
    "babel-plugin-dynamic-import": "^1.0.0",
    "vue": "^3.2.37"
  },
  "devDependencies": {
    "babel-loader": "^8.2.5",
    "clean-webpack-plugin": "^4.0.0",
    "css-loader": "^6.7.1",
    "html-webpack-plugin": "^5.5.0",
    "sass-loader": "^13.0.2",
    "style-loader": "^3.3.1",
    "vue-loader": "^17.0.0",
    "vue-template-compiler": "^2.7.8",
    "webpack": "^5.74.0",
    "webpack-cli": "^4.10.0",
    "webpack-dev-server": "^4.10.0"
  }
}
以及webpack的简单配置:
const path = require('path');
const { VueLoaderPlugin } = require('vue-loader');

const HtmlWebpackPlugin = require('html-webpack-plugin');

const { CleanWebpackPlugin } = require('clean-webpack-plugin');

module.exports = {
  entry: './main.js',
  output: {
    path: path.resolve(__dirname, './dist'),
    filename: '[name].[fullhash].js'
  },
  mode: 'development',
  module: {
    rules: [
      {
        test: /\.vue$/,
        use: ['vue-loader']
      },
      // {
      //   test: /\.js$/,
      //   use: ['babel-loader']
      // },
      {
        test: /\.scss$/,
        use: ['sass-loader']
      },
      {
        test: /\.css$/,
        use: ['style-loader', 'css-loader']
      }
    ]
  },
  plugins: [
    new VueLoaderPlugin(),
    new HtmlWebpackPlugin({
      template: './public/index.html'
    }),
    new CleanWebpackPlugin(),
  ],
  devServer: {
    port: 8333
  }
}
还有main.rs:
import { createApp } from 'vue'
import App from './index/vModelTest.vue';

console.log(App);

createApp({
  ...App
}).mount('#app')以及我们vModelTest.vue的代码:
<template>
  <div>
    <Add v-model:[xx].hi="xxx" />
    <input type="checkbox" v-model="haha">
  </div>
</template>

<script setup>
import Add from './add.vue';
import { ref } from 'vue';
  const xx = `aa`;
  const xxx = ref(666);
  const haha = ref(777);
</script>Ok,让我们来看下产物
这里贴出生产环境和开发环境的两种:
开发环境:
{ render: function render(_ctx, _cache, $props, $setup, $data, $options) {
  return ((0,vue__WEBPACK_IMPORTED_MODULE_0__.openBlock)(), (0,vue__WEBPACK_IMPORTED_MODULE_0__.createElementBlock)("div", null, [
	// Add组件

    (0,vue__WEBPACK_IMPORTED_MODULE_0__.createVNode)($setup["Add"], (0,vue__WEBPACK_IMPORTED_MODULE_0__.normalizeProps)({
      [$setup.xx]: $setup.xxx,
      ["onUpdate:" + $setup.xx]: _cache[0] || (_cache[0] = $event => (($setup.xxx) = $event)),
      [$setup.xx + "Modifiers"]: { hi: true }
    }), null, 16 /* FULL_PROPS */),

	// input
    (0,vue__WEBPACK_IMPORTED_MODULE_0__.withDirectives)((0,vue__WEBPACK_IMPORTED_MODULE_0__.createElementVNode)("input", {
      type: "checkbox",
      "onUpdate:modelValue": _cache[1] || (_cache[1] = $event => (($setup.haha) = $event))
    }, null, 512 /* NEED_PATCH */), [
      [vue__WEBPACK_IMPORTED_MODULE_0__.vModelCheckbox, $setup.haha]
    ])
  ]))
}

setup: function setup(__props, { expose }) {
  expose();

const xx = `aa`;
  const xxx = (0,vue__WEBPACK_IMPORTED_MODULE_1__.ref)(666);
  const haha = (0,vue__WEBPACK_IMPORTED_MODULE_1__.ref)(777);

const __returned__ = { xx, xxx, haha, Add: _add_vue__WEBPACK_IMPORTED_MODULE_0__["default"], ref: vue__WEBPACK_IMPORTED_MODULE_1__.ref }
Object.defineProperty(__returned__, '__isScriptSetup', { enumerable: false, value: true })
return __returned__
}
}
看着应该有点乱,其实很好理解
render(_ctx, _cache, $props, $setup, $data, $options):首先是render function的参数,这些不必多说,你要runtime渲染,那自然需要runtime的数据支撑。也从这里,script编译产物和template编译产物终于完全联系上了(之所以用了完全,是因为前面我们编译template时也用到了script编译产物的部分:bindMetaData)$setup["Add"]:自然就是我们的组件,这里补充一下compiler-sfc相关的知识,我们的setup语法糖之所以被叫做语法糖,那就是因为编译阶段会帮我们转换回defineComponent({ props: {}, emit: {}, setup: () {} })这种,所有我们的import都会被放到setup里面,这也就是为什么Add组件是从setup里暴露出来的。_cache[0]:这货和我们要分析的没关系,不过还是提一嘴,这是一种runtime cache,是一种优化,因为函数结构是固定的。
其它也没啥好说的了。
然后我们来看下生产环境的编译产物,调整webpack.config.js中mode为production:
setup(e){
  const t = mt(666), r = mt(777);
  return (e, n) => (Tn(), Nn("div", null,
    [
      Bn(ra, p({ aa: t.value, "onUpdate:aa": n[0] || (n[0] = e => t.value = e), aaModifiers: { hi: !0 } }), null, 16),
      Br(Hn("input", { type: "checkbox", "onUpdate:modelValue": n[1] || (n[1] = e => r.value = e) }, null, 512), [[zo, r.value]])
    ])
  )
}你应该发现了render function不见了,只剩一个setup。其实render function是被整合进setup里了。
为啥要这么做呢(前面mark下的问题):
因为要实现热更新(HMR)!
如果只是改动template,那么script部分完全没必要重新编译。当然,之所以把render function单独拿出来应该还有其它考量,这里我就不多说了。这里只需要记住和热更新有关即可。
然后我们顺便看下vue编译的最终产物(不包含webpack其它流程):
const teamVModelStr = readFileSync(resolve(__dirname, './test_vmodel/index.vue'), 'utf-8');

test('test_vmodel_compile', () => {
  const { descriptor } = parse(teamVModelStr);
  let compiler_res = compile(descriptor.template?.content as string);

  expect(compiler_res).toBe(teamStr);
})然后运行这个测试用例,拿到vue编译的最终产物
const _Vue = Vue;
return function render(_ctx, _cache) {
  with (_ctx) {
    const {
      resolveComponent: _resolveComponent,
      normalizeProps: _normalizeProps,
      createVNode: _createVNode,
      vModelCheckbox: _vModelCheckbox,
      createElementVNode: _createElementVNode,
      withDirectives: _withDirectives,
      openBlock: _openBlock,
      createElementBlock: _createElementBlock,
    } = _Vue;
    const _component_Add = _resolveComponent("Add");
    return (
      _openBlock(),
      _createElementBlock("div", null, [
        _createVNode(
          _component_Add,
          _normalizeProps({
            [xx]: xxx,
            ["onUpdate:" + xx]: ($event) => (xxx = $event),
            [xx + "Modifiers"]: { hi: true },
          }),
          null,
          16 /* FULL_PROPS */
        ),
        _withDirectives(
          _createElementVNode(
            "input",
            {
              type: "checkbox",
              "onUpdate:modelValue": ($event) => (haha = $event),
            },
            null,
            8 /* PROPS */,
            ["onUpdate:modelValue"]
          ),
          [[_vModelCheckbox, haha]]
        ),
      ])
    );
  }
};那些以_开头的就是runtime helper。
ok,编译阶段到此就结束了,接下来我们来看下runtime部分的源码。
runtime源码分析#
这块调试会比较麻烦一些,毕竟我们编译阶段是通过测试用例来调试的,而编译的产物并不能直接用于runtime的测试用例调试。
不过在开始写测试用例之前,我们需要思考下我们要看的runtime代码是哪些,这会直接影响到我们分析流程:
- 在哪里执行
render function,这一步非常重要,意味着组件实例的创建,也就是(局部)渲染的开头。 - 组件使用
v-model是怎么把属性传递给子组件即数据更新时如何从props传递数据给子组件,又是怎么做到数据变化时子组件通知父组件的即如何emit给父组件。这里有两个地方需要关注,prop和emit。(实际上就是分析组件的props注入和emit提交)。 input或者自定义元素使用v-model是如何实现数据变化监听的(这个其实不是很必要,相信大家都知道是通过绑定原生事件来实现,不过这里还是看一下,因为要配合下面一点)- **最重要的一点:**是怎么做到
setup数据变化时更新视图,视图中交互时更新数据的。(这一点是包含在上面第二第三部分里的,不单独分析)
目前就分为上面几点,然后我们来定义调试方案。
寻找调试方案#
虽然包里自带的jest环境是支持client的,但是写一大串内容也是很累的。。
要么我们调整链路,把包的引用改成本地路径(就像我们前面compiler-sfc引用compiler-dom那么做),但是runtime涉及的包引用是很多的,和编译阶段不同(形象一点的说:编译阶段是一条链路层层套下去的,runtime则是扁平的,虽然渲染这块流程也是固定的,但是辅助函数等其它不是。。),改起来也挺累,并且可能遗漏某个流程就麻烦了。
貌似也可以直接通过h函数来实现,不过写起来也有些麻烦,另外就看不到转换的过程了。
当然,也可以直接采用暴力的方案:直接去之前看编译产物的项目中看!
简单地说就是跑到浏览器上去debugger,属于是回归传统,毕竟是runtime环境。
low,但是省事!
不过我们还是选择写测试用例,因为代码和调试都在同一个屏里,这样会直观一些。
那么我们就需要之前拿到的编译产物,然后将它稍微调整下(去除webpack相关的处理):
import {
  createApp,
  createElementBlock,
  createElementVNode,
  createVNode,
  h,
  normalizeProps,
  openBlock,
  provide,
  ref,
  vModelCheckbox,
  withDirectives
} from '../src'
describe('test vModel describe', () => {
  test('test vModel in runtime', () => {
    const Add = {
      __name: 'add',
      props: {
        aa: {
          '0': false,
          '1': true,
          default: -1
        }
      },
      emits: ['update:aa'],
      render: function render(
        _ctx: any,
        _cache: any,
        $props: any,
        $setup: any,
        $data: any,
        $options: any
      ) {
        return (
          openBlock(),
          createElementBlock(
            'div',
            {
              onClick:
                _cache[0] ||
                (_cache[0] = ($event: any) => $setup.emit('update:aa', 123))
            },
            '123'
          )
        )
      },
      setup: function setup(__props: any, other: Record<any, any> = {}) {
        const { expose, emit } = other || {};

        expose && expose()

        const props = __props
        const __returned__ = { props, emit }
        Object.defineProperty(__returned__, '__isScriptSetup', {
          enumerable: false,
          value: true
        })
        return __returned__
      },
      __file: 'index/add.vue',
      __hmrId: '53f97a46'
    }

    const rootCmp = {
      __name: 'vModelTest',
      emits: ['ha'],
      render: function render(
        _ctx: any,
        _cache: any,
        $props: any,
        $setup: any,
        $data: any,
        $options: any
      ) {
        return (
          openBlock(),
          createElementBlock('div', null, [
            createVNode(
              $setup['Add'],
              normalizeProps({
                [$setup.xx]: $setup.xxx,
                ['onUpdate:' + $setup.xx]:
                  _cache[0] ||
                  (_cache[0] = ($event: any) => ($setup.xxx = $event)),
                [$setup.xx + 'Modifiers']: { hi: true }
              }),
              null,
              16 /* FULL_PROPS */
            ),
            withDirectives(
              createElementVNode(
                'input',
                {
                  type: 'checkbox',
                  'onUpdate:modelValue':
                    _cache[1] ||
                    (_cache[1] = ($event: any) => ($setup.haha = $event))
                },
                null,
                512 /* NEED_PATCH */
              ),
              [[vModelCheckbox, $setup.haha]]
            )
          ])
        )
      },
      setup: function setup(
        __props: any,
        other: Record<any, any> = {}
      ) {
        const { expose, emit } = other || {};

        expose && expose()
        const xx = `aa`
        const xxx = ref(666)
        const haha = ref(777)
        provide('x', 'haha')

        const __returned__ = {
          xx,
          xxx,
          haha,
          emit,
          Add,
          provide,
          ref
        }
        Object.defineProperty(__returned__, '__isScriptSetup', {
          enumerable: false,
          value: true
        })
        return __returned__
      },
      __file: 'index/vModelTest.vue',
      __hmrId: '59121920'
    }

    const root = document.createElement('div');
    const app = createApp(rootCmp).mount(root);
    console.log(app, root);
    expect(true).toBe(true);

  })
})把webpack的module名去掉即可,然后引入vue相关的api。
这样我们就可以调试了。
如果你有好的方案和简洁的配置,请务必评论区里说下,不胜感激!
render function在哪执行#
从入口createApp这一块到patch中间一大段这里不分析,如果对这块感兴趣可以去看往期分析:vue runtime源码分析学习——patch汇总 - 知乎 (zhihu.com)。
ok,我们来开始旅途。
先抛开我们以前的知识,我们根据常理来看,render function执行的时机应该得是在函数创建/更新的时候!
那么又根据我们以前分析得到的知识:
我们知道组件创建的地方是在patch阶段,那么具体在patch阶段的哪里呢?直接从patch函数往里走就能看到了:processComponent。
  const patch: PatchFn = (
    n1,
    n2,
    container,
    anchor = null,
    parentComponent = null,
    parentSuspense = null,
    isSVG = false,
    slotScopeIds = null,
    optimized = __DEV__ && isHmrUpdating ? false : !!n2.dynamicChildren
  ) => {
// ... 省略其它类型
else if (shapeFlag & ShapeFlags.COMPONENT) {
          processComponent(
            n1,
            n2,
            container,
            anchor,
            parentComponent,
            parentSuspense,
            isSVG,
            slotScopeIds,
            optimized
          )
        }
   // ... 省略其它类型
}然后我们进入到processComponent中,看到:
        mountComponent(
          n2,
          container,
          anchor,
          parentComponent,
          parentSuspense,
          isSVG,
          optimized
        )

  const mountComponent: MountComponentFn = (
    initialVNode,
    container,
    anchor,
    parentComponent,
    parentSuspense,
    isSVG,
    optimized
  ) => {
    // 2.x compat may pre-create the component instance before actually
    // mounting
    const compatMountInstance =
      __COMPAT__ && initialVNode.isCompatRoot && initialVNode.component
    const instance: ComponentInternalInstance =
      compatMountInstance ||
      (initialVNode.component = createComponentInstance(
        initialVNode,
        parentComponent,
        parentSuspense
      ))

        // ...省略非必要代码

     // resolve props and slots for setup context
    if (!(__COMPAT__ && compatMountInstance)) {
	// ...
      setupComponent(instance)
    // ...
    }

    setupRenderEffect(
      instance,
      initialVNode,
      container,
      anchor,
      parentSuspense,
      isSVG,
      optimized
    )

      // ...
}因为我们是创建,所以走的是mount,如果是更新,则执行updateComponent函数。
这里的createComponentInstance就是我们组件实例创建的入口。
export function createComponentInstance(
    vnode: VNode,
    parent: ComponentInternalInstance | null,
    suspense: SuspenseBoundary | null
  ) {
    const type = vnode.type as ConcreteComponent
    // inherit parent app context - or - if root, adopt from root vnode
    const appContext =
      (parent ? parent.appContext : vnode.appContext) || emptyAppContext

    const instance: ComponentInternalInstance = {
      uid: uid++,
      vnode,
      type,
      parent,
      appContext,
      root: null!, // to be immediately set
      next: null,
      subTree: null!, // will be set synchronously right after creation
      effect: null!,
      update: null!, // will be set synchronously right after creation
      scope: new EffectScope(true /* detached */),
      render: null,
      proxy: null,
      exposed: null,
      exposeProxy: null,
      withProxy: null,
      provides: parent ? parent.provides : Object.create(appContext.provides),
      accessCache: null!,
      renderCache: [],

      // local resolved assets
      components: null,
      directives: null,

      // resolved props and emits options
      propsOptions: normalizePropsOptions(type, appContext),
      emitsOptions: normalizeEmitsOptions(type, appContext),

      // emit
      emit: null!, // to be set immediately
      emitted: null,

      // props default value
      propsDefaults: EMPTY_OBJ,

      // inheritAttrs
      inheritAttrs: type.inheritAttrs,

      // state
      ctx: EMPTY_OBJ,
      data: EMPTY_OBJ,
      props: EMPTY_OBJ,
      attrs: EMPTY_OBJ,
      slots: EMPTY_OBJ,
      refs: EMPTY_OBJ,
      setupState: EMPTY_OBJ,
      setupContext: null,

      // suspense related
      suspense,
      suspenseId: suspense ? suspense.pendingId : 0,
      asyncDep: null,
      asyncResolved: false,

      // lifecycle hooks
      // not using enums here because it results in computed properties
      isMounted: false,
      isUnmounted: false,
      isDeactivated: false,
      bc: null,
      c: null,
      bm: null,
      m: null,
      bu: null,
      u: null,
      um: null,
      bum: null,
      da: null,
      a: null,
      rtg: null,
      rtc: null,
      ec: null,
      sp: null
    }
    if (__DEV__) {
      instance.ctx = createDevRenderContext(instance)
    } else {
      instance.ctx = { _: instance }
    }
    instance.root = parent ? parent.root : instance
    instance.emit = emit.bind(null, instance)

    // apply custom element special handling
    if (vnode.ce) {
      vnode.ce(instance)
    }

    return instance
  }
代码不是很长,所以全放出来了。
appContext:组件创建时需要的上下文数据,如果此时存在父组件,自然是用父组件的上下文。uid:组件的id,每个组件都有自己的id,作为scoped的id,也是作为HMR需要的id。provides:你可能会想,这货是不是provide/inject?是的:
provide('x', 'haha');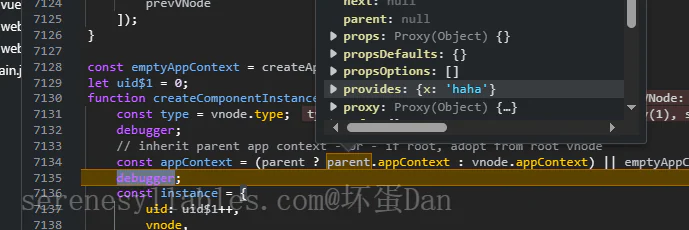
EMPTY_OBJ:后面一大串的这玩意儿都是初始化的数据,现在还不能填充。EffectScope:ReactiveEffect是它的一个字段,切勿搞混。是父组件收集子组件的,父组件更新也会触发子组件更新。normalizePropsOptions:和normalizeEmitOptions这俩就不说了,就是整理下props和emit而已。createDevRenderContext:这货是用来跟踪渲染上下文的,这里可以简单理解为和sourcemap相同效果的吧,用__DEV__区分开来的原因前面说过了,开发阶段会单独把render的拿出来。instance.emit = emit.bind(null, instance):绑定emit的上下文,另外这个emit我们等会也要说一下,也是我们要分析的一部分。ce:这玩意儿是自定义元素的,这里就不多说了。
然后我们回到mountComponent那里,我们还需要初始化setup函数:
export function setupComponent(
  instance: ComponentInternalInstance,
  isSSR = false
) {
  isInSSRComponentSetup = isSSR

  const { props, children } = instance.vnode
  const isStateful = isStatefulComponent(instance)
  initProps(instance, props, isStateful, isSSR)
  initSlots(instance, children)

  const setupResult = isStateful
    ? setupStatefulComponent(instance, isSSR)
    : undefined
  isInSSRComponentSetup = false
  return setupResult
}initProps这里先不说,后面分析第二部分的时候我们再分析,比较复杂isStateful:表示组件的状态,其它比如还有SUSPENSE、KEPT_ALIVE等。
然后我们来看下setupStatefulComponent:
function setupStatefulComponent(
  instance: ComponentInternalInstance,
  isSSR: boolean
) {
  const Component = instance.type as ComponentOptions

  // ...省略一系列dev的validate

  // 0. create render proxy property access cache
  instance.accessCache = Object.create(null)
  // 1. create public instance / render proxy
  // also mark it raw so it's never observed
  instance.proxy = markRaw(new Proxy(instance.ctx, PublicInstanceProxyHandlers))
  if (__DEV__) {
    exposePropsOnRenderContext(instance)
  }
  // 2. call setup()
  const { setup } = Component
  if (setup) {
    const setupContext = (instance.setupContext =
      setup.length > 1 ? createSetupContext(instance) : null)

    setCurrentInstance(instance)
    pauseTracking()
    const setupResult = callWithErrorHandling(
      setup,
      instance,
      ErrorCodes.SETUP_FUNCTION,
      [__DEV__ ? shallowReadonly(instance.props) : instance.props, setupContext]
    )
    resetTracking()
    unsetCurrentInstance()

    if (isPromise(setupResult)) {
      setupResult.then(unsetCurrentInstance, unsetCurrentInstance)
      // ...省略SSR以及SUSPENSE(异步组件)、dev的警告
    } else {
      handleSetupResult(instance, setupResult, isSSR)
    }
  } else {
    finishComponentSetup(instance, isSSR)
  }
}markRaw:这个是标记这个对象不需要被监听,不参与响应式流程。PublicInstanceProxyHandlers:这个简单说就是代理组件实例的一些属性,比如$attrs等的访问。代码量较大所以不贴了,感兴趣自行去看。exposePropsOnRenderContext:这个还是单独拎出来说下,也是前面说到的dev下会单独拿出render function,那么就需要有个数据作为script和template之间的桥梁,即instace.ctx。这个函数是将ctx[key]代理到instance.props[key]。createSetupContext:创建setup上下文,代理attrs(只读)、expose、emit以及slot。setCurrentInstance:全局唯一,指向当前正在创建的组件自身,类似的还有activeEffect等,都是用来指向当前正在实例化或者创建的组件,毕竟是单线程,这一点可以放心。然后这里面还打开了领域,也就是前面提过一嘴的EffectScope.on,毕竟可能过一会全局唯一就不是指向这个组件,而是它的子组件,然后等所有子组件实例化完之后才会回到它这里,类似栈的特性。callWithErrorHandling:就是执行setup,顺便记录下错误信息。setupResult:这个就是setup函数执行的返回值,也就是我们在setup中return出去的东西。unsetCurrentInstance:释放当前的ActiveEffectScope重新指向组件的parent。isPromise(setupResult):这个要提一嘴,因为组件可以是异步的:Async Components | Vue.js (vuejs.org),既然是异步的,那自然要等到then的时候才能重设activeAffectScope上下文。handleSetupResult:代码就不看了,在这里面prod把setup的结果赋值给render,dev则是把setupResult代理到instance.setupState,然后再用ctx代理一次,前面是代理prop,这次是代理data(按vue2.x的说法,实际上就是setup返回出去的数据)。finishComponentSetup:结束setup初始化的最后一步,也不看代码,简单说下里面做了什么,如果是on-the-fly(也就是runtime-compoiled),那么template的解析将在这里处理。然后最终的render赋值到instance.render。
那么至此,setup就初始化完毕了。
开始有些乱了,这里简单的总结下setupComponent里面做了什么,方面后续分析:
- 调用
initProps和initSlots初始化组件实例的的prop和slot,initProps我们之后再分析,至于initSlot就不说了,不是我们此次的范围。 - 如果是
dev,则需要在执行setup之前代理prop到ctx(dev中沟通template和script的桥梁)上。 - 创建
setup上下文,代理一些属性比如$attrs等 - 执行
setup函数,得到返回值setupResult,prod此时拿到的setupResult就是render。如果是异步的,需要在then中才能释放currentInstance prod将setupResult赋值给instace.render。dev则是代理setupResult并将值代理给ctx(此时是data,上次是props)。如果是runtime-compiled,则需要调用compiler-core的代码处理template。最终的render function再赋值给instance.render。
那么我们回到mountComponent中,现在我们setup执行完了,组件实例也初始化完毕了,接下来就是准备渲染了。
  const setupRenderEffect: SetupRenderEffectFn = (
    instance,
    initialVNode,
    container,
    anchor,
    parentSuspense,
    isSVG,
    optimized
  ) => {
    const componentUpdateFn = () => { ... }

    // create reactive effect for rendering
    const effect = (instance.effect = new ReactiveEffect(
      componentUpdateFn,
      () => queueJob(update),
      instance.scope // track it in component's effect scope
    ))

    const update: SchedulerJob = (instance.update = () => effect.run())
    update.id = instance.uid
    // allowRecurse
    // #1801, #2043 component render effects should allow recursive updates
    toggleRecurse(instance, true)

    update()
}代码稍微有些多,在省略了vue2.x的部分生命周期 + 信息栈跟踪 + devTools等以及更新渲染部分之后,还剩下100多行。
我们先不看componentUpdateFn里面做了什么
ReactiveEffect:这个是依赖收集和组件能响应式更新的核心,这里不再说了,主要是篇幅问题,感兴趣可以去看往期文章。queueJob:这个是任务调度队列,简单地说组件更新会触发它,然后组件把自己放进任务调度队列中排队等待重新渲染从而达成更新。也是以前说过的。
然后返回来看componentUpdateFn:
const componentUpdateFn = () => {
  if (!instance.isMounted) {
    let vnodeHook: VNodeHook | null | undefined;
    const { el, props } = initialVNode;
    const { bm, m, parent } = instance;
    const isAsyncWrapperVNode = isAsyncWrapper(initialVNode);

    toggleRecurse(instance, false);
    // ...省略beforeMount hook执行
    // ...省略onVnodeBeforeMount执行
    // ...省略hydrateNode场景
    const subTree = (instance.subTree = renderComponentRoot(instance));
    patch(null, subTree, container, anchor, instance, parentSuspense, isSVG);
    initialVNode.el = subTree.el;
    // ...省略mounted hook执行
    // ...省略onVnodeMounted执行
    instance.isMounted = true;
    // #2458: deference mount-only object parameters to prevent memleaks
    initialVNode = container = anchor = null as any;
  } else {
    // ...省略更新渲染部分
  }
};
几个生命周期我就不都说了,自行记住即可(是有可能作为面试题的,他们就喜欢这么玩)。
onVnodeBeforeMount以及onVnodeMounted:这个提一嘴,它们是一种特殊的用法,是通过父组件注册函数的方式来监听子组件的生命周期,vue3和vue2有差异,具体看文章:VNode Lifecycle Events | Vue 3 Migration Guide (vuejs.org)。initialVNode:呃,这个也提一下吧,这个得在patch递归之前就创建完毕,调用createVNode创建vnode,这货代表newVNode。既然有new,自然就有old,old是之前就存在的,具体是patch diff的一部分,这里就不多说了。
核心部分就是:
    const subTree = (instance.subTree = renderComponentRoot(instance));
patch(null, subTree, container, anchor, instance, parentSuspense, isSVG);而我们第一部分render function只需要renderComponentRoot这一部分。
patch这里先不说,因为涉及到我们的第三部分也就是原生元素和自定义元素的事件绑定这些,我们在第三部分分析。
那么我们来看下renderComponentRoot:
export function renderComponentRoot(
  instance: ComponentInternalInstance
): VNode {
  let result;
  let fallthroughAttrs;
  const prev = setCurrentRenderingInstance(instance);
  try {
    if (vnode.shapeFlag & ShapeFlags.STATEFUL_COMPONENT) {
      // withProxy is a proxy with a different `has` trap only for
      // runtime-compiled render functions using `with` block.
      const proxyToUse = withProxy || proxy;
      result = normalizeVNode(
        render!.call(
          proxyToUse,
          proxyToUse!,
          renderCache,
          props,
          setupState,
          data,
          ctx
        )
      );
       // ...省略一大段其它内容
    }
  } catch (error) {
    // ...省略错误兜底处理
  }
  setCurrentRenderingInstance(prev);
  return result;
}
省略了一大堆内容,我们这里只需要了解上面这四步:
const prev = setCurrentRenderingInstance(instance):前面说过,整个渲染流程都需要将组件相关的对象抛到全局做唯一,所以这里自然也得对齐。prev是父组件渲染上下文,和前面也是对齐的setCurrentRenderingInstance(prev):有拿自然有还,将渲染上下文指回父组件。normalizedVNode:这个就不多说了,因为在这个场景中并不影响。
render!.call:这就是我们的目标,render function就在这里执行!我们来看下产物:
let result = {
  __v_isVNode: true,
  __v_skip: true,
  type: "div",
  props: null,
  key: null,
  ref: null,
  scopeId: null,
  slotScopeIds: null,
  children: [
    // 我这只有俩子元素,都是dynamicChildren,所以这里的省略掉
  ],
  component: null,
  suspense: null,
  ssContent: null,
  ssFallback: null,
  dirs: null,
  transition: null,
  el: null,
  anchor: null,
  target: null,
  targetAnchor: null,
  staticCount: 0,
  shapeFlag: 17,
  patchFlag: 0,
  dynamicProps: null,
  dynamicChildren: [
    {
      __v_isVNode: true,
      __v_skip: true,
      type: {
        __name: "add",
        props: {
          aa: {
            0: false,
            1: true,
            default: -1,
          },
        },
        emits: ["update:aa"],
        render: function render(_ctx, _cache, $props, $setup, $data, $options) {
          return (
            (0, src_1.openBlock)(),
            (0, src_1.createElementBlock)(
              "div",
              {
                onClick:
                  _cache[0] ||
                  (_cache[0] = ($event) => $setup.emit("update:aa", 123)),
              },
              "123"
            )
          );
        },
        setup: function setup(__props, other = {}) {
          const { expose, emit } = other || {};
          expose && expose();
          const props = __props;
          const __returned__ = { props, emit };
          Object.defineProperty(__returned__, "__isScriptSetup", {
            enumerable: false,
            value: true,
          });
          return __returned__;
        },
        __file: "index/add.vue",
        __hmrId: "53f97a46",
      },
      props: {
        aa: 666,
        "onUpdate:aa": ($event) => ($setup.xxx = $event),
        aaModifiers: {
          hi: true,
        },
      },
      key: null,
      ref: null,
      scopeId: null,
      slotScopeIds: null,
      children: null,
      component: null,
      suspense: null,
      ssContent: null,
      ssFallback: null,
      dirs: null,
      transition: null,
      el: null,
      anchor: null,
      target: null,
      targetAnchor: null,
      staticCount: 0,
      shapeFlag: 4,
      patchFlag: 16,
      dynamicProps: null,
      dynamicChildren: null,
      appContext: null,
    },
    {
      __v_isVNode: true,
      __v_skip: true,
      type: "input",
      props: {
        type: "checkbox",
        "onUpdate:modelValue": ($event) => ($setup.haha = $event),
      },
      key: null,
      ref: null,
      scopeId: null,
      slotScopeIds: null,
      children: null,
      component: null,
      suspense: null,
      ssContent: null,
      ssFallback: null,
      dirs: [
        {
          dir: {
            deep: true,
            created: function (el, _, vnode) {
              el._assign = getModelAssigner(vnode);
              (0, events_1.addEventListener)(el, "change", () => {
                const modelValue = el._modelValue;
                const elementValue = getValue(el);
                const checked = el.checked;
                const assign = el._assign;
                if ((0, shared_1.isArray)(modelValue)) {
                  const index = (0, shared_1.looseIndexOf)(
                    modelValue,
                    elementValue
                  );
                  const found = index !== -1;
                  if (checked && !found) {
                    assign(modelValue.concat(elementValue));
                  } else if (!checked && found) {
                    const filtered = [...modelValue];
                    filtered.splice(index, 1);
                    assign(filtered);
                  }
                } else if ((0, shared_1.isSet)(modelValue)) {
                  const cloned = new Set(modelValue);
                  if (checked) {
                    cloned.add(elementValue);
                  } else {
                    cloned.delete(elementValue);
                  }
                  assign(cloned);
                } else {
                  assign(getCheckboxValue(el, checked));
                }
              });
            },
            mounted: function setChecked(el, { value, oldValue }, vnode) {
              // store the v-model value on the element so it can be accessed by the
              // change listener.
              el._modelValue = value;
              if ((0, shared_1.isArray)(value)) {
                el.checked =
                  (0, shared_1.looseIndexOf)(value, vnode.props.value) > -1;
              } else if ((0, shared_1.isSet)(value)) {
                el.checked = value.has(vnode.props.value);
              } else if (value !== oldValue) {
                el.checked = (0, shared_1.looseEqual)(
                  value,
                  getCheckboxValue(el, true)
                );
              }
            },
            beforeUpdate: function (el, binding, vnode) {
              el._assign = getModelAssigner(vnode);
              setChecked(el, binding, vnode);
            },
          },
          instance: {},
          value: 777,
          oldValue: undefined,
          arg: undefined,
          modifiers: {},
        },
      ],
      transition: null,
      el: null,
      anchor: null,
      target: null,
      targetAnchor: null,
      staticCount: 0,
      shapeFlag: 1,
      patchFlag: 512,
      dynamicProps: null,
      dynamicChildren: null,
      appContext: null,
    },
  ],
  appContext: null,
};
本来打算省略掉无关字段的,但是想了下觉得全部给出来让大家看下整个组件在执行完normalizeVNode(render.call())之后是什么样的。
这里拿到的result也就是render function执行的结果,将作为new VNode传递给patch,然后diff再然后创建真实dom,最终渲染到浏览器上面。
ok,那么第一部分我们就分析到这里。
简单的总结下:
在总结之前,简单的说下patch流程,我们的整个app入口是createApp,它创建一个appContext,这个上下文初始化完毕后,我们调用的(createApp(AppCmp).)mount(dom)会执行app.mount,app.mount实际上是包裹一层的render(注意这个render不是组件自带的render,而是外部定义的一个普通函数名叫render而已,其内部实际上是调用patch)那么就进入了patch不断递归自己的流程,在patch过程中判断不同的type,然后分类去patch且渲染。组件的创建和渲染都是在patch阶段中实现。
- 因为是创建,所以调用的是
patch阶段里的processComponent,在里面判断是否是更新,如果是更新,则调用updateComponent,否则调用mountComponent。 - 在
mountComponent里我们调用createComponentInstance创建组件的实例 - 接着调用
setupComponent函数执行setup函数,初始数据。 - 在
setupComponent函数中我们调用了initProps初始化props,然后调用setupStatefulComponent函数,在里面执行setup函数并把结果抛给instance.render(prod),使用ctx代理props以及setupState,作为template和script编译之后的数据桥梁(dev)。到这setup函数执行完毕,只差执行render function。 - 调用
setupRenderEffect函数,创建组件的响应式effect(ReactiveEffect),注册更新组件(渲染组件)的函数。然后执行第一次渲染,调用渲染函数componentUpdateFn,在里面调用renderComponentRoot函数。 renderComponentRoot函数执行render function,创建vnode。- 拿到
new VNode之后可以递归进入下一次patch了,然后一边diff,一边渲染,一边递归patch直到结束。
组件是怎么做到双向绑定的#
实际上双向绑定涉及到两个点:props和emit,所以我们来分析这俩块。
到这里已经5w字了。。嘴太碎没办法。。所以可能得大幅减少流程。。
initProps#
在看initProps之前,我们还需要了解下normalizePropsOptions做了什么,前面我们只是说它里面整理了下props,但是没说清楚。
normalizedPropsOptions整理的是组件自身的props字段,比如:
      props: {
        aa: {
          '0': false,
          '1': true,
          default: -1
        }
},会被整理成:[normalized, needCastKeys]
[
  {
    aa: {
      "0": false,
      "1": true,
      default: -1,
    },
  },
  [
    "aa",
  ],
]然后initProps里的props并不是这个,而是来自于父组件的,回看下我们前面拿到的new VNode里dynamicChildren第一个里的props,我们在initProps里拿到的vnode.props就是这个:
      props: {
        aa: 666,
        "onUpdate:aa": ($event) => ($setup.xxx = $event),
        aaModifiers: {
          hi: true,
        },
      },
而这个数据的前身是:
          normalizeProps({
            [$setup.xx]: $setup.xxx,
            ['onUpdate:' + $setup.xx]:
              _cache[0] ||
              (_cache[0] = ($event: any) => ($setup.xxx = $event)),
            [$setup.xx + 'Modifiers']: { hi: true }
}),它是在render function时执行的,这个normalizeProps是一个runtime helper。
另外这里还要提一嘴:
当前的instance是子组件,但是我们前面又说过父组件走到一半可能会遇到子组件,然后把xxx上下文交给子组件。
那这不就冲突了吗?
实际上我没说清楚,创建vnode是顺序的,即父组件创建完了再创建子组件的,可以回看下前面renderComponentRoot的产物即new VNode,可以发现子组件还没创建组件实例。
但是渲染不是,先渲染父组件再渲染子组件这句话本身就是有悖的,即你渲染完了父组件,那么子组件必定也渲染完了,是栈的特性,后进先出,子组件必定先于父组件渲染完毕。
那么响应式更新也是如此,如果一个子组件进入任务调度队列先于父组件(在同一批次队列中排队等待更新),那么这个子组件很有可能会二次渲染。
ok,扯远了。
我们来看下initProps的代码:
export function initProps(
  instance: ComponentInternalInstance,
  rawProps: Data | null,
  isStateful: number, // result of bitwise flag comparison
  isSSR = false
) {
  const props: Data = {};const attrs: Data = {};
  def(attrs, InternalObjectKey, 1)
  instance.propsDefaults = Object.create(null)
  setFullProps(instance, rawProps, props, attrs)
  // ensure all declared prop keys are present
  for (const key in instance.propsOptions[0]) {
    if (!(key in props)) {
      props[key] = undefined
    }
  }
  // ...省略validation
  if (isStateful) {
    // stateful
    instance.props = isSSR ? props : shallowReactive(props)
  } else { // ... 省略其它场景
  }
  instance.attrs = attrs
}propsOptions:这个就是前面提到的normalizedPropsOptions的产物rawProps:传递给initProps的propsdef:Object.defineProperty设置__vInternal为1。
我们来看下setFullProps里做了什么:
function setFullProps(
  instance: ComponentInternalInstance,
  rawProps: Data | null,
  props: Data,
  attrs: Data
) {
  const [options, needCastKeys] = instance.propsOptions
  let hasAttrsChanged = false
  let rawCastValues: Data | undefined
  if (rawProps) {
    for (let key in rawProps) {
      // key, ref are reserved and never passed down
      if (isReservedProp(key)) {
        continue
      }
      // ...省略兼容性代码
      const value = rawProps[key]
      // prop option names are camelized during normalization, so to support
      // kebab -> camel conversion here we need to camelize the key.
      let camelKey
      if (options && hasOwn(options, (camelKey = camelize(key)))) {
        if (!needCastKeys || !needCastKeys.includes(camelKey)) {
          props[camelKey] = value
        } else {
          ;(rawCastValues || (rawCastValues = {}))[camelKey] = value
        }
      } else if (!isEmitListener(instance.emitsOptions, key)) {
        // ...省略兼容性代码
        if (!(key in attrs) || value !== attrs[key]) {
          attrs[key] = value
          hasAttrsChanged = true
        }
      }
    }
  }

  if (needCastKeys) {
    const rawCurrentProps = toRaw(props)
    const castValues = rawCastValues || EMPTY_OBJ
    for (let i = 0; i < needCastKeys.length; i++) {
      const key = needCastKeys[i]
      props[key] = resolvePropValue(
        options!,
        rawCurrentProps,
        key,
        castValues[key],
        instance,
        !hasOwn(castValues, key)
      )
    }
  }

  return hasAttrsChanged
}

export const isReservedProp = /*#__PURE__*/ makeMap(
  // the leading comma is intentional so empty string "" is also included
  ',key,ref,ref_for,ref_key,' +
    'onVnodeBeforeMount,onVnodeMounted,' +
    'onVnodeBeforeUpdate,onVnodeUpdated,' +
    'onVnodeBeforeUnmount,onVnodeUnmounted'
)isReservedProp:一些内置的不能作为props传给子组件。这里面的几个监听子组件生命周期的用法前面又说到过,不多说。camelize:驼峰化,dddd。isEmitListener:判断是否是父组件的update:xx=() => {}。
其它的就不说了,我们只是简单的了解下props的流程,这个函数就是在配对,把子组件的prop和父组件的prop配对,配上了就放到props里,来看下结果:
attrs: {
  aaModifiers: {
    hi: true,
  },
},
props: {
  aa: 666,
}我们的自定义修饰符被放到了attrs里,实际上一些没用到的props也会被放到这里面。
貌似有东西不见了?先别急
回到initProps里
shallowReactive:响应式props,不过是浅的,只响应式最外层,内部的对象不做响应式处理。
最后赋值给instance.props,那么子组件的props就搞定了。然后把其它放到attrs里。
那么initProps简单地说就是在配对,把子组件定义的prop和父组件给的prop进行配对,配上了就保留到instance.props里,否则放到attrs里。
那么回过头,我们是不是少了什么东西?我们更新数据的update:xx=() => {}怎么不见了!
因为props不需要这个,所以被去掉了。
那么哪里需要呢?自然是emit。
我们需要在emit的时候去执行来自prop里的update:xx=() => {}的() => {}。
但是emit要从哪里开始分析呢?
还记得createComponentInstance里的instance.emit = emit.bind(null, instance)么?
(注意这里bind第二个参数会作为函数调用的第一个参数,具体可见:Function.prototype.bind() - JavaScript | MDN (mozilla.org))
然后再回看下前面是怎么调用emit的:
onClick:_cache[0] || (_cache[0] = ($event) => $setup.emit("update:aa", 123)),没错,这里的setup.emit就是上面instance.emit。
所以我们来看下emit函数做了什么
不过这个调试需要触发click事件才行,那么我们模拟下:
   // Add组件
	createElementBlock(
          'div',
          {
            id: '123',
            onClick:
              _cache[0] ||
              (_cache[0] = ($event: any) => $setup.emit('update:aa', 123))
          },
          '123'
        )

	createApp(rootCmp).mount(root)
    document.body.appendChild(root); // 怪不得抓半天抓不到。。。。。
    document.getElementById('123')?.click();
然后就可以了,我们来看下emit:
export function emit(
  instance: ComponentInternalInstance,
  event: string,
  ...rawArgs: any[]
) {
  if (instance.isUnmounted) return
  const props = instance.vnode.props || EMPTY_OBJ

  // ...省略校验

  let args = rawArgs
  const isModelListener = event.startsWith('update:')

  // for v-model update:xxx events, apply modifiers on args
  const modelArg = isModelListener && event.slice(7)
  if (modelArg && modelArg in props) {
    const modifiersKey = `${
      modelArg === 'modelValue' ? 'model' : modelArg
    }Modifiers`
    const { number, trim } = props[modifiersKey] || EMPTY_OBJ
    if (trim) {
      args = rawArgs.map(a => a.trim())
    }
    if (number) {
      args = rawArgs.map(toNumber)
    }
  }
  // ... 省略警告等
  let handlerName
  let handler =
    props[(handlerName = toHandlerKey(event))] ||
    // also try camelCase event handler (#2249)
    props[(handlerName = toHandlerKey(camelize(event)))]
  // for v-model update:xxx events, also trigger kebab-case equivalent
  // for props passed via kebab-case
  if (!handler && isModelListener) {
    handler = props[(handlerName = toHandlerKey(hyphenate(event)))]
  }

  if (handler) {
    callWithAsyncErrorHandling(
      handler,
      instance,
      ErrorCodes.COMPONENT_EVENT_HANDLER,
      args
    )
  }

  const onceHandler = props[handlerName + `Once`]
  if (onceHandler) {
    if (!instance.emitted) {
      instance.emitted = {} as Record<any, boolean>
    } else if (instance.emitted[handlerName]) {
      return
    }
    instance.emitted[handlerName] = true
    callWithAsyncErrorHandling(
      onceHandler,
      instance,
      ErrorCodes.COMPONENT_EVENT_HANDLER,
      args
    )
  }
  // ...省略兼容性代码
}handler:这个就是我们的update:xx=()=>{}。Once:这个是事件修饰符.once在编译阶段变化成的,比如@click.once会变成onClickOnce。可见:Event Handling | Vue.js (vuejs.org)
这个函数没啥好说的,就是runtime调用这个emit的时候去判断是否是update:xx,然后和prop配对下,如果对上了就执行,这就达成了对父组件的数据更新。
噢,貌似一直没说,这里执行的函数是($event) => ($setup.xxx = $event)。$setup此时已经响应式了,所以父组件的数据是同步更新。
ok,props和emit双向更新我们已经说完了,可能有些点我没点出来,那么就在这总结的地方一起说出来:
先说props的
- 子组件创建实例的时候调用
normalizePropsOptions时整理自己定义的prop - 父组件在进入渲染阶段时会创建子组件实例,此时父组件准备给子组件的
props都已处理好,子组件实例可以直接用。 - 调用
initProps让子组件定义的props和父组件给的props配对,配上了就作为最终的props,(浅)包裹一层响应式。 - 父组件数据更新
xxx的时候会刷新视图里的$setup.xxx,然后父组件进入更新渲染阶段,又触发子组件更新,此时props也跟着刷新,这就达成了父组件数据变化带动子组件prop数据变化。
然后是emit的:
- 父组件编译阶段会将
v-model拆分成两个prop,一个作为数据传递给子组件,另一个则是函数update:xx=($event) => ($setup.xxx = $event)。 - 组件创建实例的时候执行
instance.emit = emit.bind(),这个instance.emit则是$setup.emit的emit。 initProps时并不会将这个事件整理到props- 触发
click事件后执行$setup.emit,此时才从prop里拿这个函数(($event) => ($setup.xxx = $event),$setup是响应式的),然后配对执行。至此完成了子组件更新数据触发父组件数据更新。
那么组件的双向绑定至此结束。
原生元素如何双向更新#
有了前面的分析了解,相信大家对这个问题应该都有了一个大概的答案。
所以如何更新input我们就不讨论了,因为和组件是一样的。
我们要分析的是原生元素是如何emit的,不对,比如说是在哪里绑定事件给emit的。
既然涉及到dom的事件监听,那么就应该在生成真实dom的时候,也就是patch的diff阶段。
和之前patchEvent不同,这次不是在这里处理的,虽然位置差不多。
我们直接在packages\runtime-dom\src\modules\events.ts文件中的addEventListener添加断点,因为我们确信原生元素是必然得通过事件监听来实现双向绑定的,所以我们直接在这打断点等它自己送上门来,然后我们就可以直接看调用栈
发现是在processElement里的invokeDirectiveHook里,我们过去看下:
    // ...省略
if (dirs) {
      invokeDirectiveHook(vnode, null, parentComponent, 'created')
    }
// ...省略
我们来看下数据:
[
  {
    dir: {
      deep: true,
      created: function (el, _, vnode) {
        el._assign = getModelAssigner(vnode);
        (0, events_1.addEventListener)(el, "change", () => {
          const modelValue = el._modelValue;
          const elementValue = getValue(el);
          const checked = el.checked;
          const assign = el._assign;
          if ((0, shared_1.isArray)(modelValue)) {
            const index = (0, shared_1.looseIndexOf)(modelValue, elementValue);
            const found = index !== -1;
            if (checked && !found) {
              assign(modelValue.concat(elementValue));
            } else if (!checked && found) {
              const filtered = [...modelValue];
              filtered.splice(index, 1);
              assign(filtered);
            }
          } else if ((0, shared_1.isSet)(modelValue)) {
            const cloned = new Set(modelValue);
            if (checked) {
              cloned.add(elementValue);
            } else {
              cloned.delete(elementValue);
            }
            assign(cloned);
          } else {
            assign(getCheckboxValue(el, checked));
          }
        });
      },
      mounted: function setChecked(el, { value, oldValue }, vnode) {
        // store the v-model value on the element so it can be accessed by the
        // change listener.
        el._modelValue = value;
        if ((0, shared_1.isArray)(value)) {
          el.checked =
            (0, shared_1.looseIndexOf)(value, vnode.props.value) > -1;
        } else if ((0, shared_1.isSet)(value)) {
          el.checked = value.has(vnode.props.value);
        } else if (value !== oldValue) {
          el.checked = (0, shared_1.looseEqual)(
            value,
            getCheckboxValue(el, true)
          );
        }
      },
      beforeUpdate: function (el, binding, vnode) {
        el._assign = getModelAssigner(vnode);
        setChecked(el, binding, vnode);
      },
    },
    instance: {},
    value: 777,
    oldValue: undefined,
    arg: undefined,
    modifiers: {},
  },
];其实就是前面renderComponentRoot即执行render function的产物,在那里就完成了转换。
这里面包含了两步:
mount即渲染时set值。change:元素created的时候监听change事件,然后更新数据。
其中change中重点的assign:
($event) => ($setup.haha = $event)那么原生元素的双向绑定至此也明白是怎么个回事了。里面具体逻辑以及如何生成的就不是本篇重点了,感兴趣可自行打断点去看。
总结#
本次我们从编译和runtime两个角度分析了v-model。
其中编译简单的回顾了下是如何处理的以及最终编译的产物。
而runtime费了一定的时间去实现测试用例,就是为了舒服的在vscode中调试。
runtime中我们做了三步:
- 分析
render function执行的位置,以及这个过程中做了什么 - 分析组件的
props和emits,解释了如何组件是如何双向绑定的:简单地说,props因为渲染流程的原因,是顺序的,只要父组件刷新数据,视图也跟着刷新,子组件也跟着刷新,自然子组件的props也跟着刷新。而emit则是调用父组件从prop传入的($event) => ($setup.xx = $event)(其中$setup是响应式的)来实现更新父组件数据。 - 简单分析了原生元素是如何双向绑定的:创建
dom的时候绑定change事件,监听数据变化,触发($event) => ($setup.xx = $event),它所在的组件数据变化的时候触发视图更新,它自然也重新刷新,在mount中set最新值。
篇幅没想到会这么长。。。。
如果对你有所帮助,那么不甚荣幸!